By [Jawad Shah] – Finance & Expense Automation Specialist
Managing personal finances can feel overwhelming, especially when you’re trying to track daily expenses, set budgets, and achieve savings goals. Whether you’re wondering how to track my expenses effectively online or searching for the easiest way to use an expense tracker tool, ExpenseTrackerTool.com offers a simple, powerful solution. This beginner-friendly Tutorial to expense tracking will walk you through every feature of this free expense tracking tool and show you exactly how to manage your finances using ExpenseTrackerTool.com.
What is ExpenseTrackerTool.com, and How Does It Work?
ExpenseTrackerTool.com is a completely free digital expense management tool designed to help individuals take control of their spending habits. Unlike complicated budgeting software or Excel spreadsheets, this expense tracking tool tutorial focuses on simplicity and effectiveness.
What is ExpenseTrackerTool.com, and how does it work? It’s a web-based platform that allows you to record expenses, categorize spending, set monthly budgets, track financial goals, and generate detailed reports—all without downloading any apps or creating an account. Yes, you read that right: no sign-up required, and your data remains completely safe on your device.
This tool works across all devices—whether you’re using a computer, tablet, or smartphone—making it the best way to track daily expenses wherever you are.
Why You Need an Online Expense Tracker
Before diving into the step-by-step guide to using ExpenseTrackerTool.com, let’s understand why tracking expenses matters. Many people struggle with overspending simply because they lack visibility into where their money goes. An expense tracking tool tutorial like this one helps you:
- Identify spending patterns and unnecessary expenses
- Set realistic budgets based on actual spending
- Achieve savings goals faster with better financial awareness
- Make informed decisions about future purchases
- Reduce financial stress through organized money management
Studies show that people who actively track their expenses save significantly more than those who don’t. With the right personal finance tracking methods, you can transform your financial health.
Getting Started: Your First Steps with ExpenseTrackerTool.com
Step 1: Access the Tool
Simply visit ExpenseTrackerTool.com in your web browser. There’s no need to create an account or sign in—one of the biggest advantages of this platform. This means you can start tracking income and expenses online immediately without any registration hassles.
Step 2: Set Your Preferences
When you first access your financial dashboard overview, you’ll notice two important settings at the top:
Currency Selection:
Choose your preferred currency from the dropdown menu. Whether you use PKR, USD, EUR, or any other currency, the tool adapts to your needs. This is essential for accurate expense categorization tips and reporting.
Language Selection:
Select your preferred language. The tool supports multiple languages, making it accessible for users worldwide.
These settings ensure that your automated budgeting tool online displays information in a format that’s most comfortable for you.
Understanding Your Dashboard: The Financial Command Center
Your dashboard is the heart of ExpenseTrackerTool.com. This financial dashboard overview provides instant insights into your financial health through four key metrics:
Total Spent This Month:
Shows your cumulative expenses for the current month, helping you monitor daily, weekly, and monthly expense tracking in real time.
Budget Remaining:
Displays how much of your monthly budget is still available, which is crucial for managing monthly expenses effectively.
Budget Used (%):
A percentage indicator showing how much of your budget you’ve consumed, helping you pace your spending throughout the month.
Transactions This Month:
Counts the number of expense entries you’ve made, giving you a sense of spending frequency.
Below these metrics, you’ll find a colorful pie chart labeled “Spending by Category.” This visual representation is one of the features of ExpenseTrackerTool.com that makes understanding your spending habits incredibly easy. Each category—Food, Shopping, Education, Internet, Rent, and others—is color-coded, allowing you to see at a glance which areas consume most of your budget.
How to Add Your Expenses on ExpenseTrackerTool.com
Now let’s get to the practical part: how do I add my expenses on ExpenseTrackerTool.com?
Step 3: Navigate to the Expenses Section
Click on “Expenses” in the left sidebar. You’ll see the “Add/Edit Expense” form at the top of the page.
Step 4: Fill in Your Expense Details
This is where expense categorization tips become important. Fill in each field carefully:
Date: Select the date when you made the purchase. The calendar picker makes this easy.
Amount: Enter the expense amount. Be precise to ensure accurate tracking.
Currency: Confirm the currency (it usually defaults to your selected preference).
Category: Choose from pre-defined categories like Food, Shopping, Education, Rent, Utility Bills, Health, or Internet. Proper categorization is key to analyzing spending habits.
Subcategory: For more detailed tracking, select a subcategory. For example, under “Food,” you might choose “Go outside,” “Guest,” or “Fruits.”
Recurring: Indicate if this is a one-time expense or if it repeats (daily, weekly, or monthly). This feature helps with the automated budgeting tool online functionality.
Note: Add a brief description like “Lunch with friends” or “Buy a jacket for winter.” This makes reviewing expenses later much easier.
Step 5: Save Your Expense
Click the blue “Save Expense” button. Your entry immediately appears in the “Expenses (Last 30 Days)” table below, showing Date, Category, Subcategory, Note, Amount, and Action buttons (Edit/Delete).
If you make a mistake, simply click “Edit” to modify the entry or “Delete” to remove it. This flexibility is what makes ExpenseTrackerTool.com the best way to set up an expense tracker step by step.
How to Set Up Your Budget
Does ExpenseTrackerTool.com help with budgeting? Absolutely! The Budget section is where you establish spending limits.
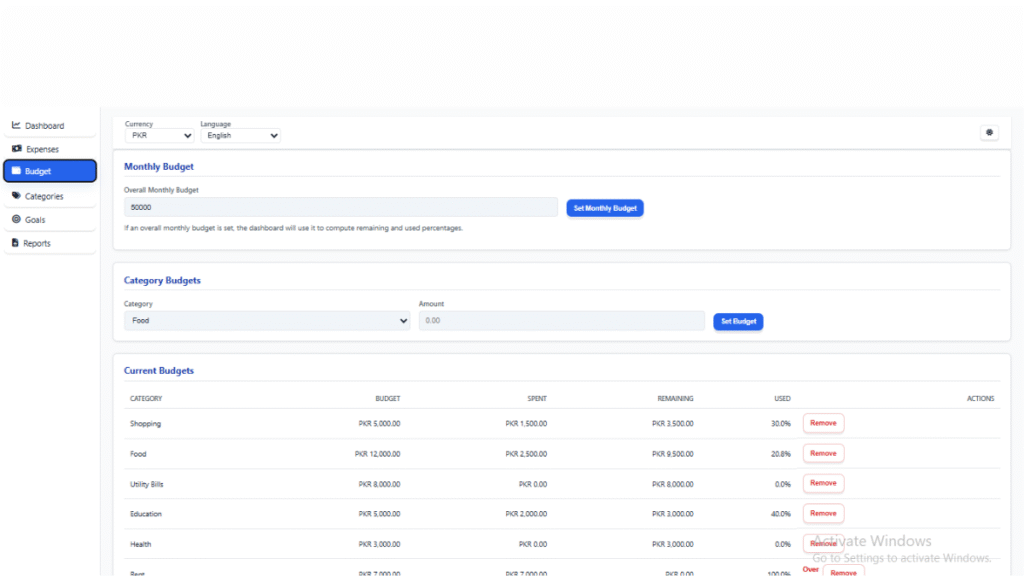
Step 6: Set Your Monthly Budget
Navigate to “Budget” in the sidebar. You’ll see two sections:
Overall Monthly Budget:
Enter your total monthly budget in the input field and click “Set Monthly Budget.” This becomes the baseline for budget planning using expense tracker calculations.
Category Budgets:
Below, you can allocate specific amounts to individual categories. Select a category from the dropdown, enter the budget amount, and click “Set Budget.”
The “Current Budgets” table shows all your category budgets with columns for Budget, Spent, Remaining, and Used percentage. This real-time tracking is essential for how to avoid overspending and staying within your financial limits.
Creating Custom Categories and Subcategories
One of the most powerful features of ExpenseTrackerTool.com is customization.
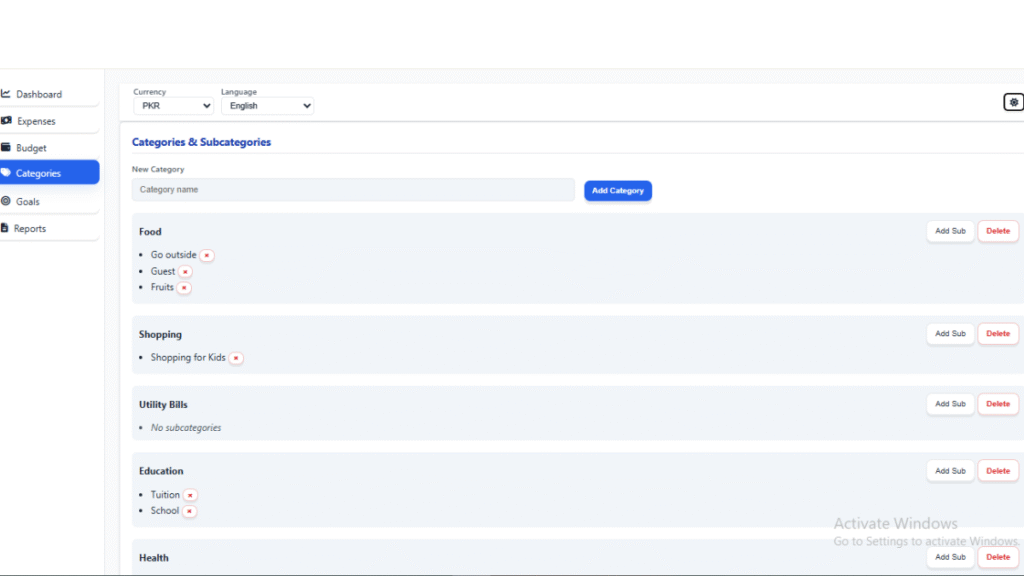
Step 7: Organize Your Categories
Click “Categories” in the sidebar. Here you can:
- Create new categories by entering a name and clicking “Add Category.”
- Add subcategories to existing categories using the “Add Sub” button.
- Delete categories or subcategories that don’t fit your lifestyle.
Pre-loaded categories include Food (with subcategories like Go Outside, Guest, and Fruits), Shopping (Shopping for Kids), Utility Bills, Education (Tuition and School), and Health. Customize these to match how to categorize my spending in an online tracker based on your personal situation.
Setting and Tracking Savings Goals
How to use an expense tracker for saving money is one of the most common questions, and ExpenseTrackerTool.com makes this easy.
Step 8: Create Your Financial Goals
Visit the “Goals” section and fill in:
- Goal Name: What are you saving for? (e.g., “Vacation Fund,” “Emergency Fund,” “New Laptop”)
- Target: The amount you want to save
Click “Add Savings Goal” to create it. Your goal appears in the “Savings Goals” table, showing Goal, Target, Saved, Progress (%), and Actions.
Use the “Add Save” button to record contributions toward your goal. Watching your progress percentage grow is incredibly motivating and demonstrates how to improve my spending habits using a tracker.
Generating Reports and Exporting Data
For those wondering, can I export my expense data? The answer is yes!
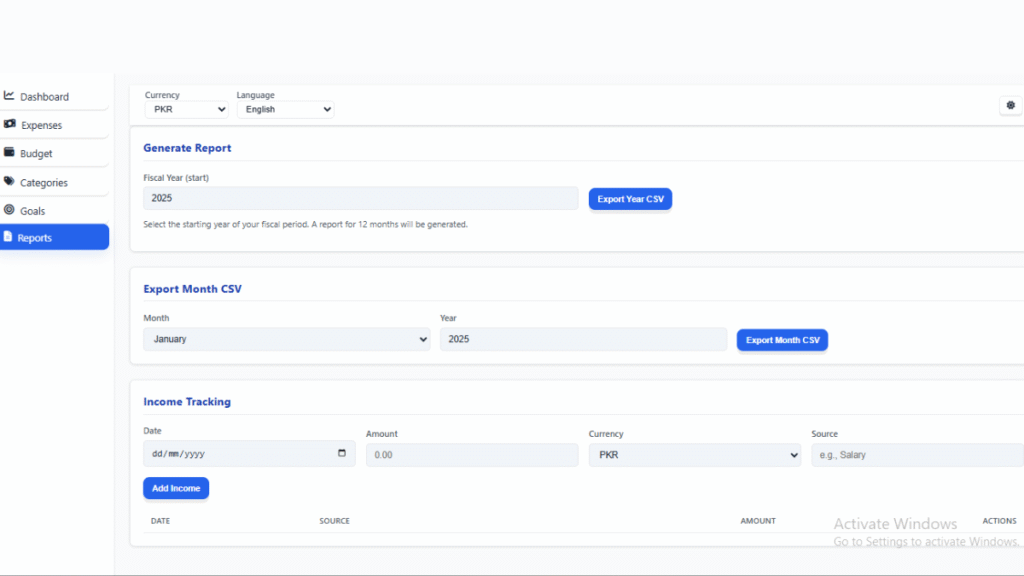
Step 9: Create Financial Reports
Navigate to the “Reports” section, where you’ll find three powerful features:
Export Year CSV: Select a fiscal year and generate a comprehensive 12-month report.
Export Month CSV: Choose a specific month and year for detailed monthly data.
Income Tracking: Record income sources alongside expenses for a complete financial picture.
These exported CSV files open in Excel or Google Sheets, perfect for how to analyze spending habits in depth or preparing for tax season.
Conclusion
Now you know exactly how to start using ExpenseTrackerTool.com from scratch. This simple, beginner-friendly approach to expense tracking removes all barriers between you and better financial management. By following this step-by-step guide to using.
ExpenseTrackerTool.com, you’re equipped to:
- Track every expense with precision
- Set realistic budgets and stick to them
- Achieve your savings goals systematically
- Understand where your money actually goes
- Make smarter financial decisions
Remember, the key to managing monthly expenses effectively is consistency. Make it a habit to record expenses immediately after making purchases. Review your dashboard weekly, adjust budgets monthly, and celebrate when you reach your savings goals.
What’s the best way to manage expenses on a computer? You’re already using it. ExpenseTrackerTool.com combines simplicity with powerful features, making it the ideal solution for anyone serious about financial wellness.
You need a better way to track expenses, So start your journey toward financial freedom today at ExpenseTrackerTool.com—no sign-up required, completely free, and designed with your success in mind.
FAQs
Q: Is ExpenseTrackerTool.com free to use?
A: Yes, completely free. There are no hidden charges, premium features, or subscription fees.
Q: Do I need to create an account?
A: No registration required. You can start tracking expenses immediately without signing up or signing in.
Q: Is my financial data secure?
A: Absolutely. Your data is stored locally on your device and remains completely private. The tool doesn’t upload your financial information to any servers.
Q: Can I use it on mobile devices?
A: Yes, ExpenseTrackerTool.com works seamlessly on all devices—computers, tablets, and smartphones.
Q: How do I reset my budget?
A: Simply navigate to the Budget section and modify your overall monthly budget or individual category budgets as needed.
Q: Can I track expenses in multiple currencies?
A: Yes, you can select from various currencies, and the tool will track all expenses in your chosen currency.
Q: What’s the difference between recurring and one-time expenses?
A: Recurring expenses repeat automatically (daily, weekly, or monthly), while one-time expenses are single transactions.
Q: How far back can I track expenses?
A: You can enter expenses for any date, allowing you to maintain historical records as far back as needed.
Q: What format is the exported CSV file?
A: Standard CSV format compatible with Excel, Google Sheets, and most spreadsheet applications.
Q: Can I share my data with my spouse/family?
A: Currently, ExpenseTrackerTool.com stores data locally on your device, so direct sharing isn’t built in. However, you can easily share your exported CSV reports via email or use the tool on a shared family device where everyone can access the same data.

Finance & Expense Automation Specialist With 3 years of experience.